|
uCONSOLE
Microconsole for programmable BASIC controller
Many people who have made tiny basic controller
report us that they would like to have autonomous possibilities for input/output.
But the resources of the controller does not allow to do it within the controller. Instead of that we offer
an external microconsole that operates like a PC terminal.
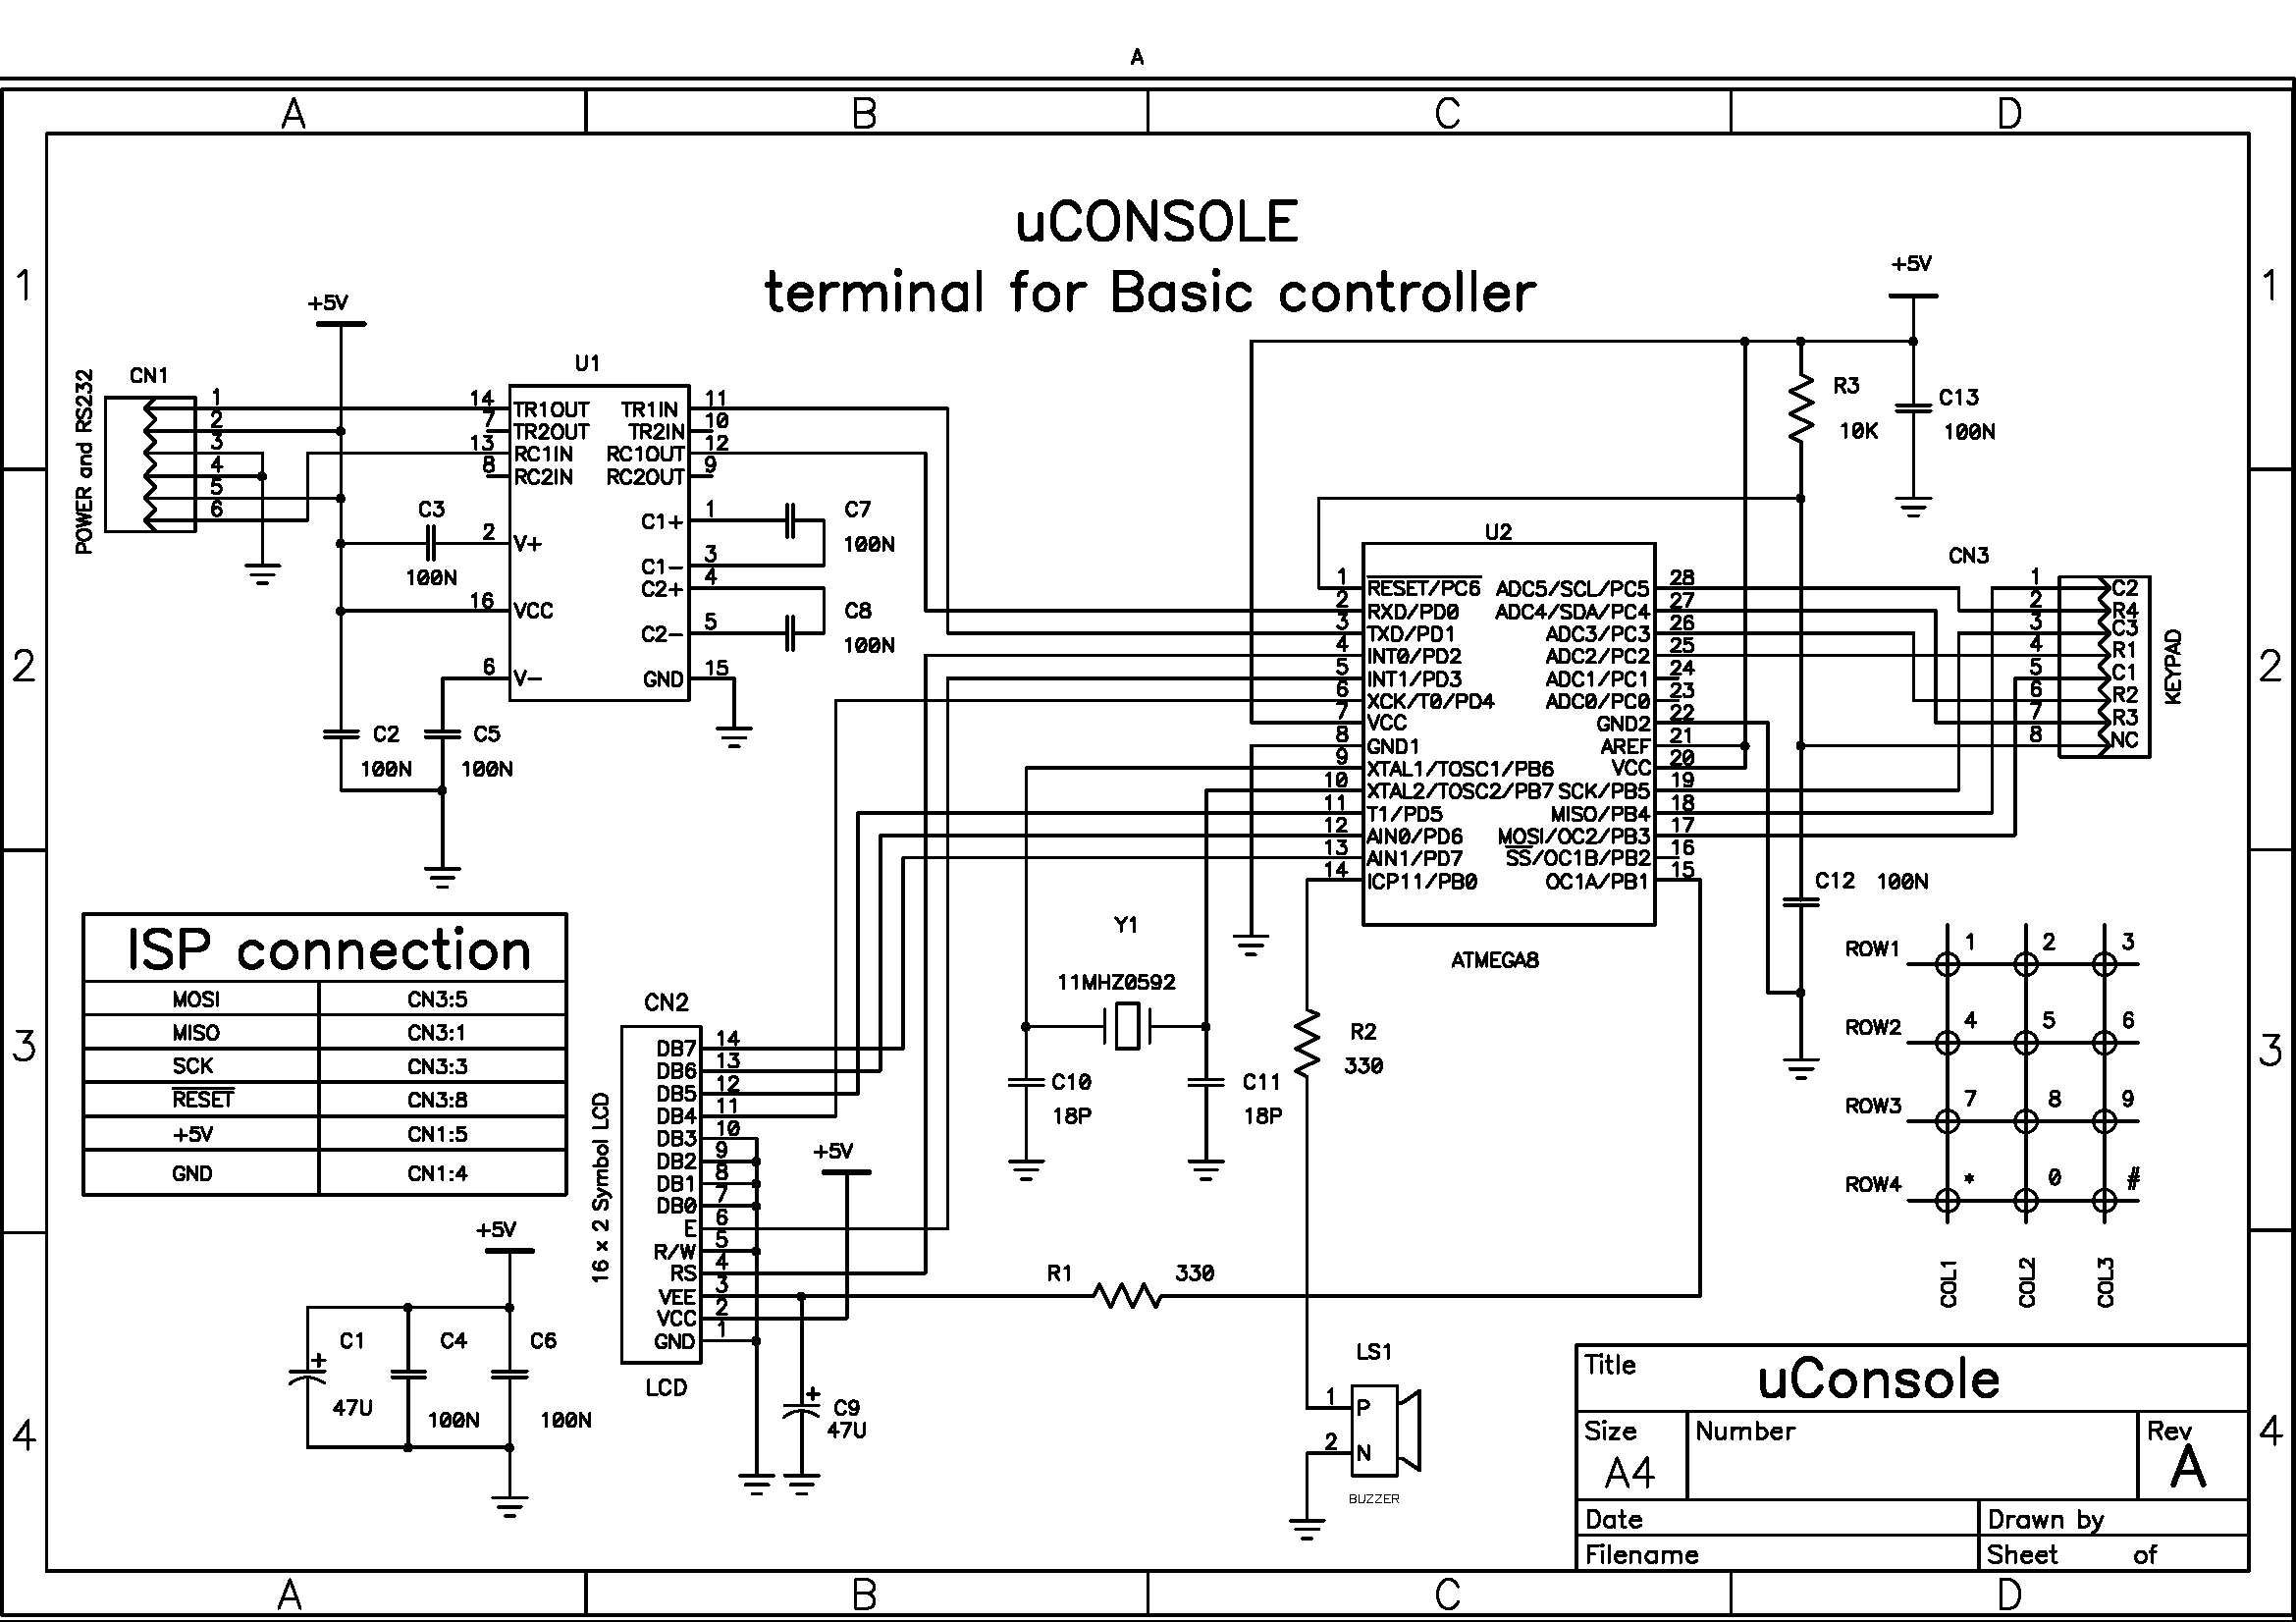
Schematic in PDF

Schematic and PCB in P-CAD 2002 format
Gerber files for fabrication
| Reference
designator |
Quantity |
Description |
Remarks |
| C2..C8, C12, C13 | 9 | CAP, 100N, 50V, 10%, |
|
| C1,C9 | 2 |
POL CAP, 47U, 25V, 20% |
|
| C10,C11 | 2 |
CAP, 18P, 50V, 10% |
|
| LS1 | 1 |
BUZZER, 2K0HZ, |
|
| R1,R2 | 2 |
RES, 300R, 0W125, 5% |
|
| R3 | 1 |
RES, 10K, 0W125, 5% |
|
| U1 | 1 |
ICL232CPE=HIN232CP(MAX232CPE)PDIP16 |
|
| U2 | 1 |
ATmega8-16PI PDIP28 |
|
| CN1 | 1 |
PLS6 |
Power and RS232 |
| CN2 | 1 |
PLS8 |
KeyPad |
| CN3 | 1 |
PBS14 |
LCD |
| Y1 | 1 |
XTAL, 11M0592 HC-49U |
|
Pay attention about the position of the first pin on your LCD. In our case we have used PBS14 (female)
as a connector CN3 placed on the bottom side and PLS14 (male) solded on the LCD. It is possible
to sold CN2 on the component side and the all of tall components on the another side for
convinient connection between LCD and the uConsole PCB.
After assmebling you need program the uConsole firmware. There is no a special connector for ISP, but
there are all of needed signals on the keypad and the power connectors. Get the firmware by link below.
uConsole Firmware v 1.0A
The first powering you should do holding the key 0 on the keypad. The default settings will be applyed.
Keypad
The main keypad layer is shown below:
1 | 2 | 3 |
4 | 5 | 6 |
7 | 8 | 9 |
F | 0 | Ent |
The next keypad layer is active for entering one symbol when is pressed the key F.
The one more layer is accessible if the key F is held more than one second (this delay is adjustable in the settings).
This layer is active for entering for one symbol after it is getting active the main layer.
The key pressing has sound notification. The short beep sounds when keys is pressed. The long beep sounds
if the key F is held more than one second that undicates about accessible of the third key layers.
uConsole has the setup. If you want to change settings you need to do some actions:
1. Turn the power off.
2. Press and hold the key F.
3. Turn the power on.
4. Wait for 3 seconds.
5. Release the key F.
You can see the first setup option:
Contrast
2-Up 8-Down[nnn]
In the brackets is shown the current value in units. You can change this value by pressing on the keys 2 and 8.
Default value is 10. You can see that contrast is changed too. Set needed level and press yhe key Enter.
You will get the next setup oprion:
Beep[nnn]>_
This is the short beep duration. In the brackets is shown the sound duration im msec. Default value is 60 msec.
The zero value turns sound off.
For this options the parameters are entered as numeric values by keypad. You can enter values from 0 to 32767 msec.
If you finish entering or value is already needed just press the key Enter.
F-beep[nnn]>_
This is the duration of the sound invdication when the third layer is getting accessible.
This sound should be different from the sound of the short beep. The zero value turnes this sound off.
Default value is 300.
Auto repeat
delay[nnn]>_
Delay before autorepeat symbols. Default value is 500.
The autorepeated keys are 2,8 и 4,6 of the main layer.
Symbol
delay[nnn]>_
Delay between autorepeated symbols. Default value is 50
F-pressing
delay[nnn]>_
Delay for the long held triggering for the key F. Default value is 1000.
Debounce
delay[nnn]>_
Debounce delay. You can enter values from 1 to 255 msec. Default value is 20.
Setup:
1=Exit 2-Save>_
This is the finishing setup option:
1 - Exit without saving parameters
2 - Exit with saving
Enter without parameters returns to the first setup option.
Display
The display shows received by RS232 symbols. If the input stream has control ANSI sequence
opened by symbol 27 (0x1b) the input parser recognizes valid commands and performs them.
The valid commands are shown below.
Control ANSI sequences
ESC - symbol with code 27 (1B - in hex)
Control sequence |
Action |
ESC[2J |
Clears display and sets cursor at row=1, column=1 |
ESC[<row>;<column>f or
ESC[<row>;<column>H |
Sets the cursor position at row, column |
ESC[f или ESC[H |
Sets the cursor position at 1,1 |
ESC[<n_shifts>C |
Shifts cursor the n_shifts times to the right |
ESC[C |
Shifts cursor to the right |
ESC[<n_shifts>D |
Shifts cursor the n_shifts times to the left |
ESC[D |
Shifts cursor to one position to the right |
Non-standard control sequences
Control sequence |
Action |
ESC0D |
Hides the cursor |
ESC0С |
Shows the cursor |
Some actions upon some single symbols
Symbol |
Action |
0x08 |
Shifts cursor to the left |
0x0A |
Ignored |
0x0С |
Clears display and sets cursor at row=1, column=1 |
0x0D |
Ignored |
The sample below shows how use ANSI sequences. Note that clear screen operation is not too fast.
Insert delay after clear screen operation.
print "$";27;"[2J";
delay 100
print "$";27;"[1;1H ADC #1 ";
print "$";27;"[2;1H ADC #2 ";
10
adc x
setb 128
print "$";27;"[1;9H";x;"     "
adc y
clrb 128
print "$";27;"[2;9H";y;"     "
goto 10
_________________________________
By
Alexander Kostyuk ua6ann@mail.ru
Evgeny Fadeev rv3bj@hotbox.ru
|